1. Getting started
The Iris-Editor is a web application with a four-stage pipeline:
- Upload a photo — JPG or PNG, any size
- Extract the iris — AI-driven, runs automatically in the background
- Edit the iris — 11 sliders for exposure, colour, sharpness, shape
- Create the artwork — your chosen style is rendered over the iris
You can download intermediate results at any stage or skip ahead.
Tip: On your first login a sample iris is automatically added to your library. That way you can try the workflow without uploading your own photo first.
Requirements
- A modern browser (Firefox, Chrome, Safari, Edge — last two versions)
- A valid PurchaseID (see next chapter)
- Internet connection — the AI steps run server-side
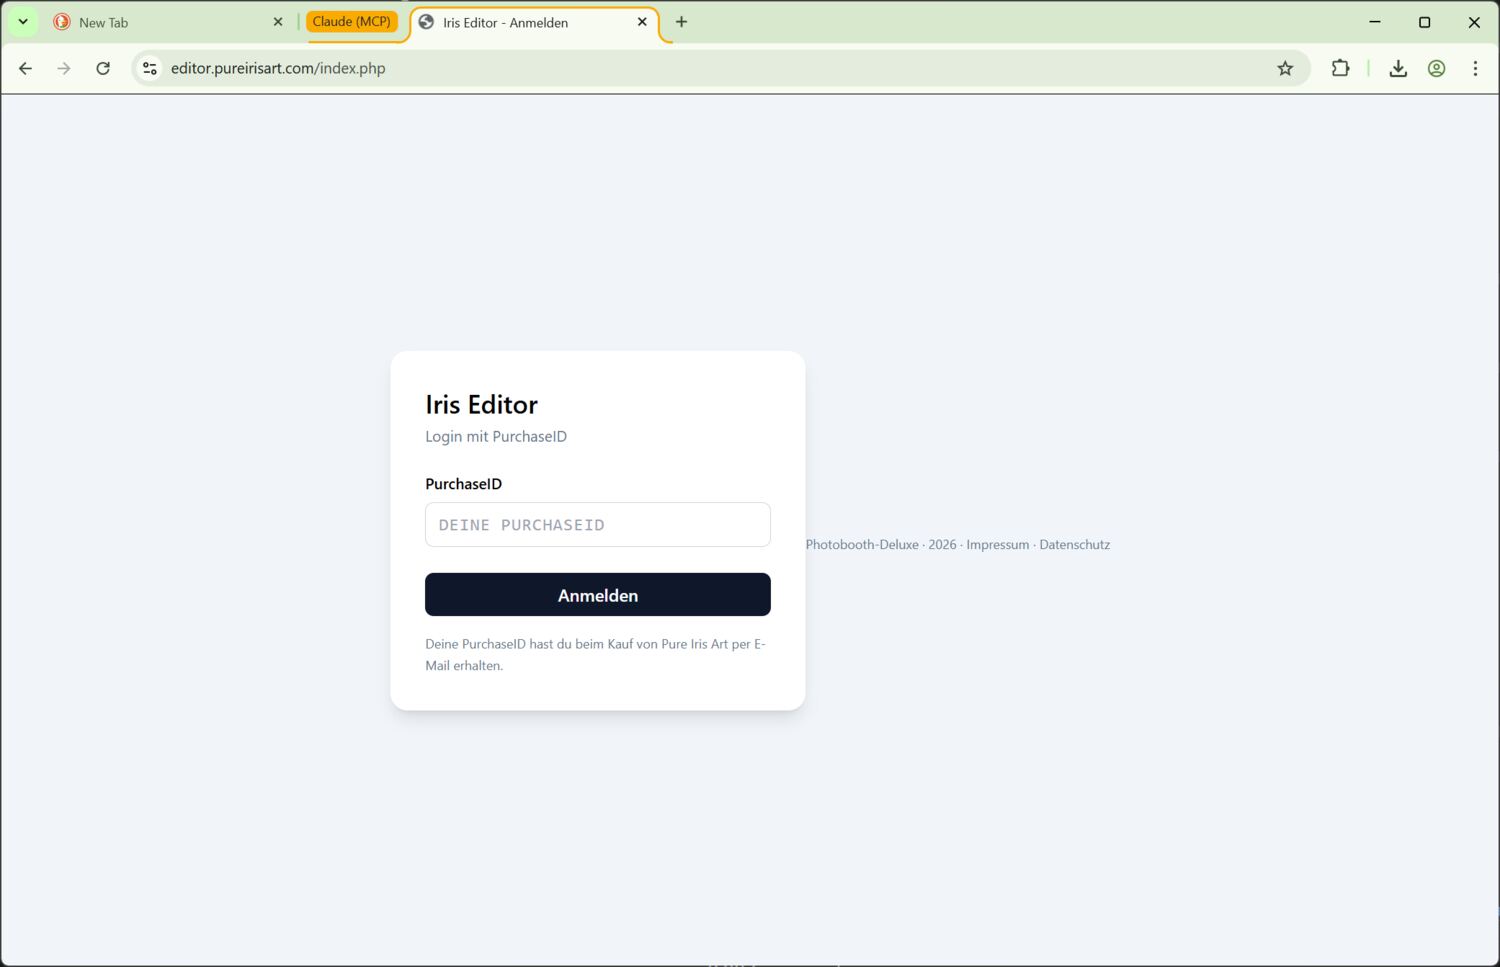
2. Login
The Iris-Editor doesn't use a password — instead it uses a permanent PurchaseID, which you receive when you buy on pureirisart.com.
Sign in
- Open
https://editor.pureirisart.com - Type your PurchaseID into the field (uppercase, no spaces)
- Click Sign in
If you arrive via a confirmation-email link, the ID is filled in automatically (?pid=YOUR_ID).
What happens after login?
You land in the Studio. On a first login the sample iris is already in your library and the guided tour starts automatically and points out the key UI elements. You can restart the tour at any time via the topbar icon.
Heads-up: Your PurchaseID never expires. Uploaded photos and extracted irises are deleted automatically after 30 days; finished artworks 30 days after they were created. Download anything important in time.
3. Upload a photo
In the Studio there's an upload button at the top left (or just drag & drop a photo onto the library area). Multiple files at once are fine.
What kind of photos work?
- Format: JPG or PNG. Maximum file size around 50 MB
- Resolution: ideally at least 3000 × 2000 pixels — the AI needs detail to extract the iris cleanly
- Subject: a sharp eye with a clearly visible iris, not a portrait taken from three metres away
- Lighting: as even as possible, no harsh shadows on the iris itself
During the upload
Each photo gets a small card in the left library column. While the iris is being extracted you'll see a progress bar — typically 30–60 seconds per photo. Meanwhile you can edit other irises or upload more.
Filenames
The original filename is kept and used to name your downloads later. You can rename it any time — right-click (or pencil icon) on the library card. That's relevant when your phone gives files names like IMG_8421.jpg: rename them to e.g. Sarah and from then on every download carries that name.
4. Iris extraction
Cutting out the iris runs entirely in the background. As soon as the card's status flips to done, the extracted iris is available as a PNG with alpha channel. Its exact resolution depends on the selected AI model.
What does the extracted iris show?
- Only the iris itself — pupil, sclera and eyelid have been cropped away
- Background either white or transparent depending on the style (see Editor)
- Free of motion blur and stray-eyelash artefacts — the AI handles that
Before uploading, choose the AI extraction model in the user menu (GNB2, CIM2 or GNBP). The choice applies to new uploads; the model actually used is shown as a short code next to the AI iris.
If extraction fails
The card shows a red error badge. Most common reasons:
- Iris in the photo too small or out of focus — upload a new photo
- API server temporarily unreachable — kick off a retry from the card
- File corrupted — check the original, re-export if necessary
The retry is a click on the small arrow-in-circle icon on the card. It restarts the extraction without re-uploading the photo.
5. Editor
In the Studio, open an iris by clicking it in the left library, then go to the Edit tab. The editor shows a before/after split slider in the centre and a panel on the right with the 11 sliders.
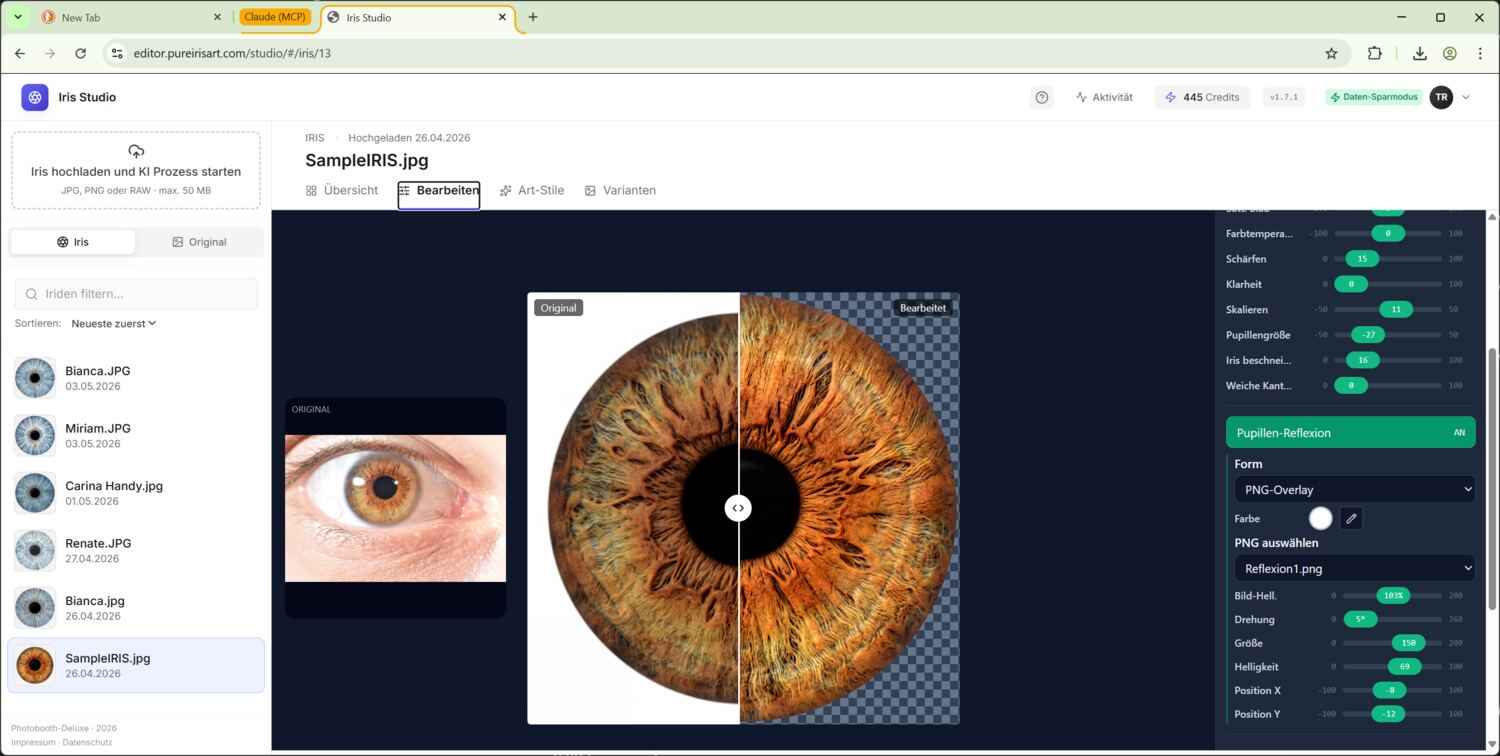
The 11 sliders
| Slider | What it does | When to use |
|---|---|---|
| Exposure | Highlights and midtones together | Rescue an over- or underexposed photo |
| Brightness | Global brightness, linear | Lift or darken the whole iris |
| Contrast | Spread between shadows and highlights | Pull out detail |
| Saturation | Colour intensity | Refresh dull irises |
| Temperature | White balance, cool vs. warm | Fix a colour cast |
| Brown correction | Damps brown pigmentation | Save detail contrast in very dark irises |
| Sharpening | Edge sharpness | Add a touch before printing |
| Crop / Padding | Trim plus padding around it | Centre the iris or leave breathing room |
| Pupil size | Pupil scaling | Show more iris area for the print |
| Iris cut-off | Hard circular cut at the iris edge | Clean round iris with no sclera left over |
| Soft edges | Gentle anti-alias edge | Iris feels softer, no hard cut |
Double-clicking a slider's label resets it to the default value. The cursor keys ← → nudge the active slider in fine steps.
Transparent background
The Transparent background toggle removes the white background of the extraction via chroma-key. It's on by default because most art styles expect an iris with an alpha channel.
Only switch it off if you want to download the iris as a plain RGB PNG with a white background.
Presets
Once you've found a slider combination you like, you can save it as a preset (top right of the editor, disk icon). The preset gets a name, lives globally in your account and can be applied to any other iris.
The preset menu shows your saved presets — clicking one applies it to the current iris. Non-matching values (e.g. pupil size) get overwritten by the preset, you can keep adjusting afterwards.
Reflection
Optional highlight (reflection) you can drop on the iris. Shape, position, size, brightness, rotation are all separately adjustable. Switch it on via the Reflection toggle, the matching sliders appear.
Save
The green Save button writes the current slider values as the edited variant of the iris. The editor closes, in the Studio you'll see the new variant in the library. Saving again overwrites — there's always at most ONE edited version per iris.
The extracted original variant stays untouched. In the art picker you choose whether a style should be applied to the raw extracted or the edited variant.
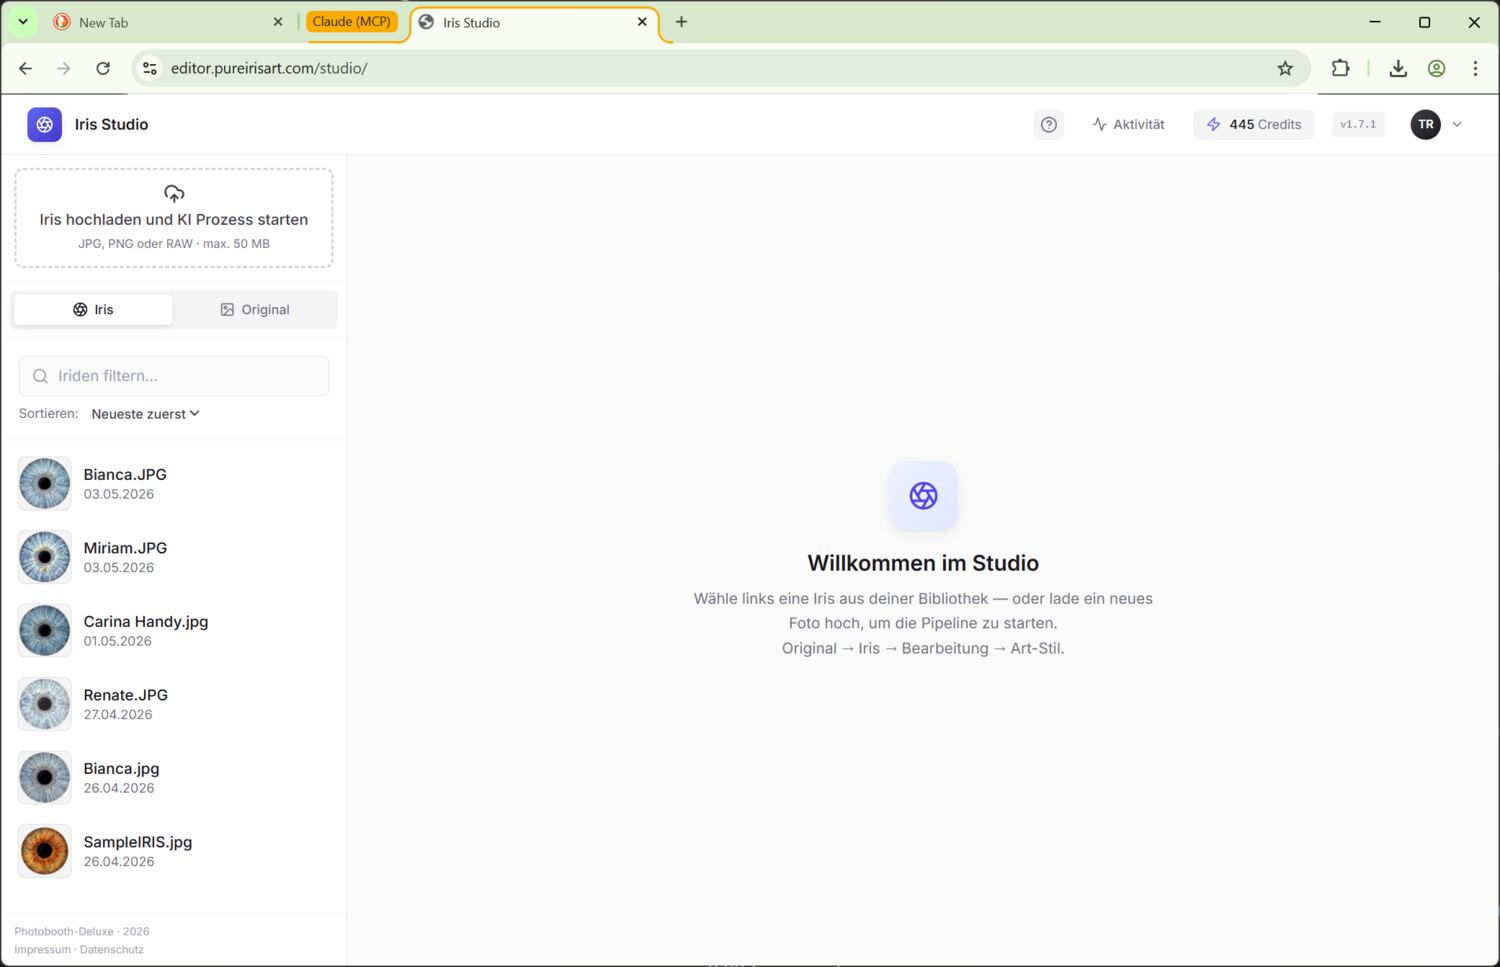
6. Studio — the central workspace
The Studio is a master-detail layout: on the left the library of all your irises, on the right the detail view of the currently selected iris with four tabs.
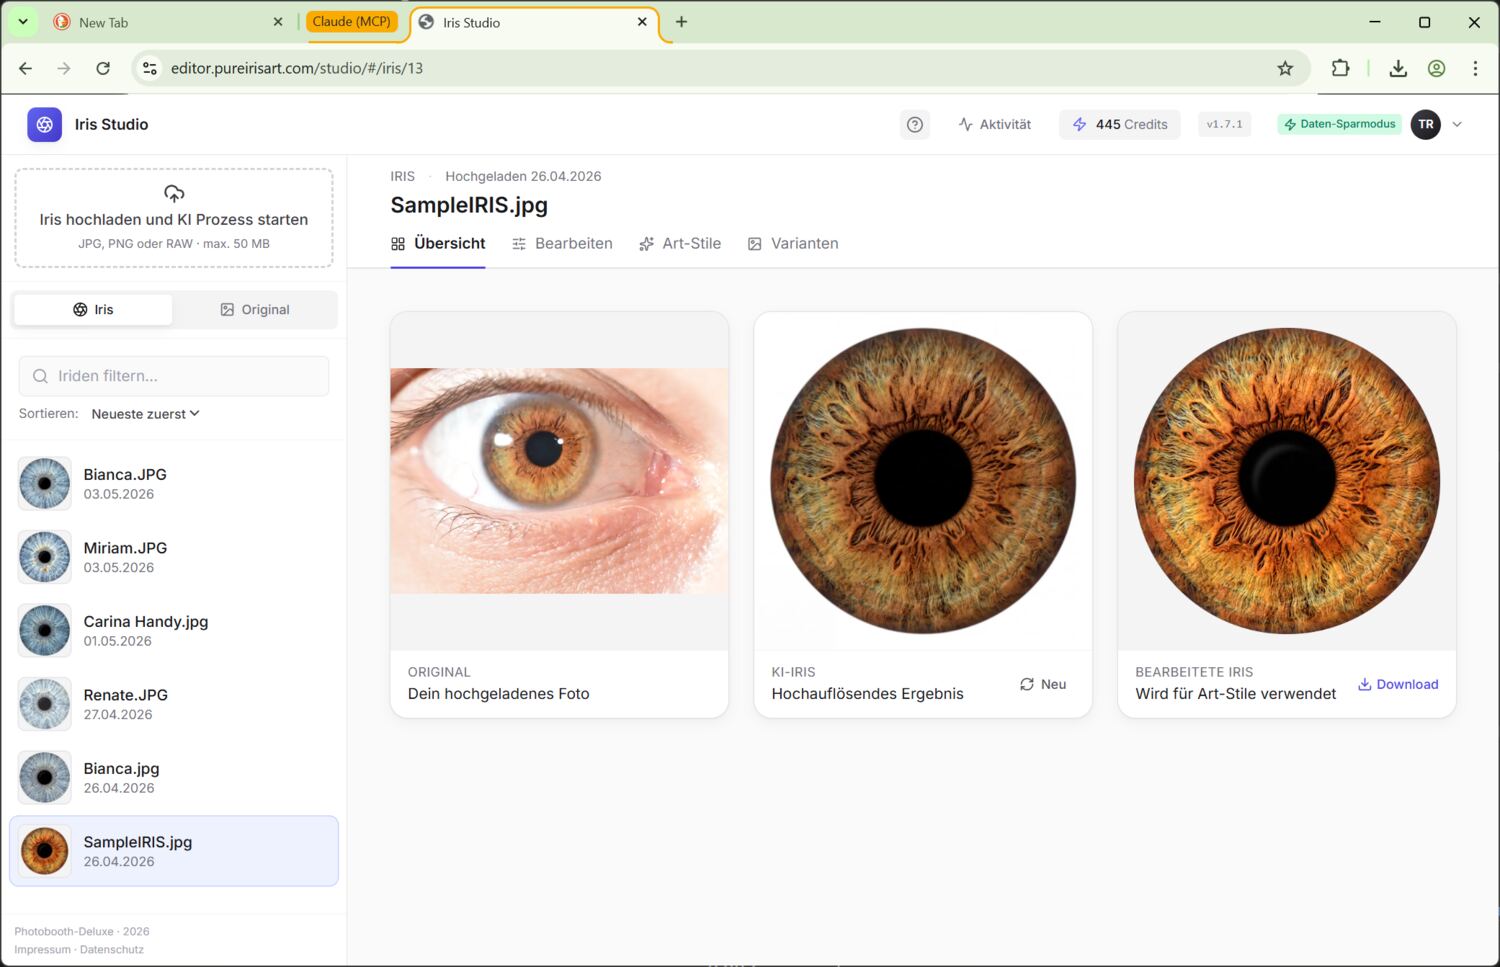
The tabs
- Overview — original, extract, edit side by side; download buttons; status info
- Edit — the editor (see chapter 5)
- Art styles — the style picker (see chapter 7)
- Variants — every artwork generated from this iris (see chapter 8)
Library (left)
Each iris is a card with thumbnail, status badge and date. Sort order can be flipped at the bottom (name / date, ascending or descending). A search filter for long lists is hidden behind the magnifying glass.
Resize the column: You can drag the library column wider at its right edge — handy when your filenames are long and would otherwise be cut off. The width you set is remembered for your next visit; double-click the edge to reset it. (Desktop only.)
Refund for an unusable AI extraction
If a finished AI extraction is unusable, the Overview tab shows a Refund button. You can apply within 72 hours of completion, provided you have not downloaded the edited iris or used it in an art style; demo irises are excluded.
The iris is locked while the request is reviewed. Approval returns 25 credits and removes the extracted and edited versions; rejection unlocks the iris again.
Topbar (top)
- Activity — indicator for background renders
- Credits — your remaining quota (sourced from the shop, not managed here)
- Tour — restarts the guided introduction
- User menu (right) — low-bandwidth mode, language, logout, optionally Events
Low-bandwidth mode
The user menu has a low-bandwidth toggle. When enabled, library and previews load at 1200 px instead of full resolution. Saves bandwidth — relevant on mobile or weak Wi-Fi. Editor and downloads still use full resolution.
Language
Four languages: DE, EN, ES, FR. Switch via the user menu. Your choice is stored in your account and applies to every device.
7. Art styles — pick & render
The Art styles tab shows every available style as a tile, grouped by iris count: 1, 2, 3, 4 or 5 irises per composition.
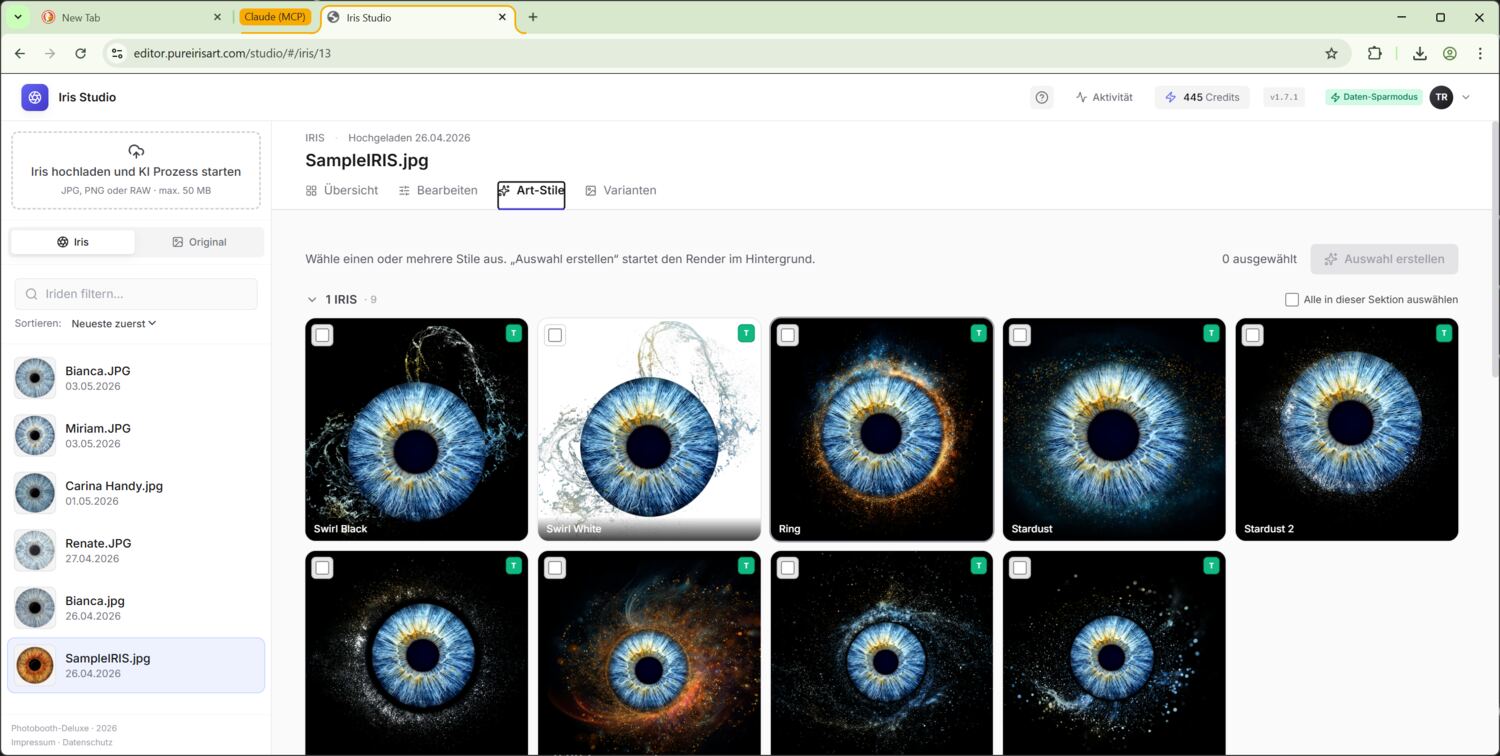
Single-iris styles
For 1-iris styles a click on the tile is enough. The tile pops a small preview modal where you can see the style on your iris (no credits consumed, just a preview). Confirm kicks off the actual render.
Multi-iris styles
Styles for 2–5 irises pop a multi-iris picker. You pick the irises for slot 1, 2, 3 etc. from your library. Requirements:
- Each slot needs an edited version with a transparent background — otherwise the style endpoint can't compose them
- No slot duplicates — each iris may appear only once per composition
- Order matters: slot 1 is usually the “main” iris, the others complement
Re-order slots: drag & drop on desktop, tap-to-swap on mobile (tap slot A, then slot B — contents swap).
Batch submit (multiple styles at once)
You can select several style tiles at the same time (checkbox top-left of every tile). An action bar then appears top and bottom with the selected count + the submit button. Click → all run sequentially.
If a style has already been rendered for this iris combination, a duplicate warning pops up before any credits are consumed — you can decide which to overwrite.
While rendering
The topbar's activity indicator counts up. The style tile itself shows a load overlay. In the Variants tab the variant appears as a placeholder with status; once it's done the overlay disappears and the preview is visible.
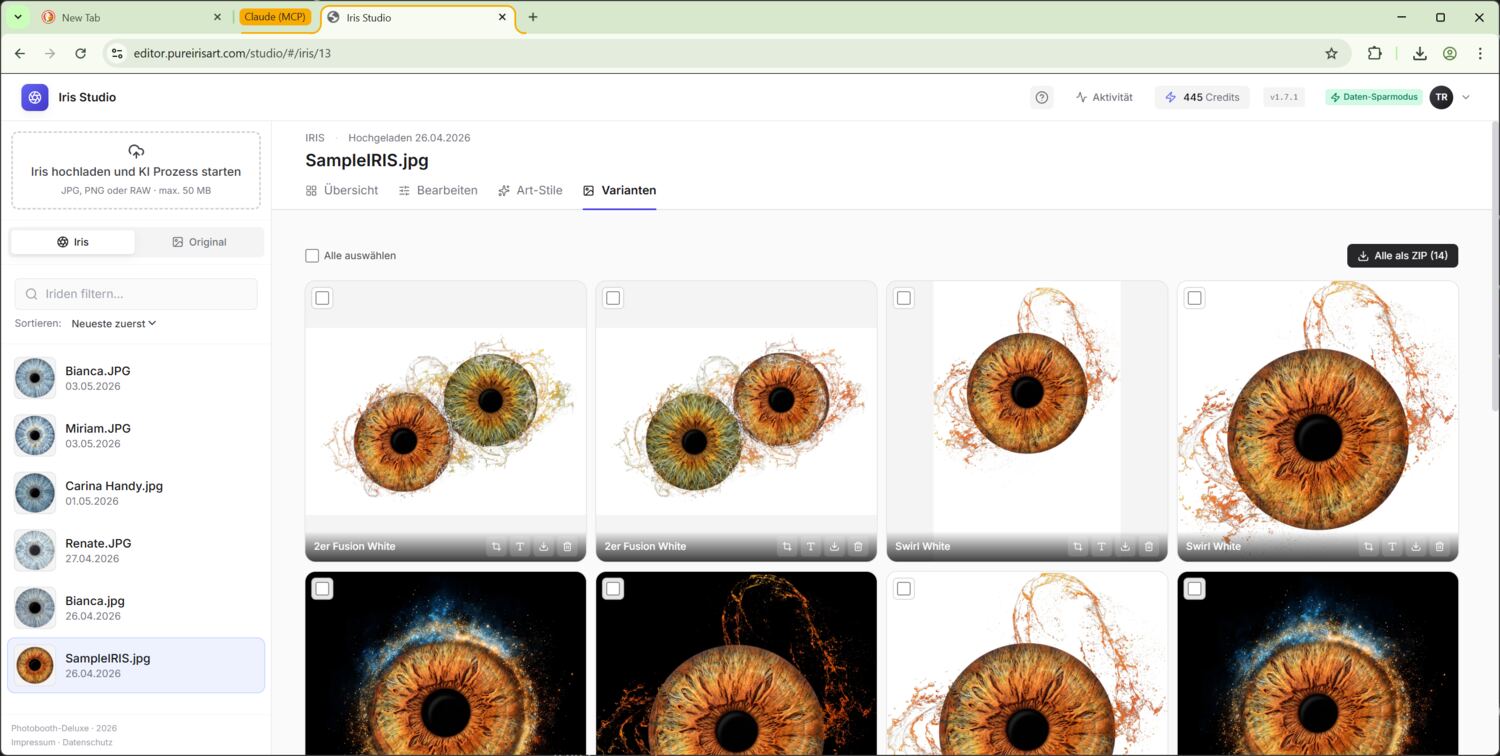
8. Manage variants
The Variants tab shows every rendered artwork of the current iris as a tile. Bottom-right of every variant there are several icons:
- 📐 Crop — crop editor
- T Text — text editor (see chapter 9)
- ⬇ Download — as JPG/PNG
- 🖨 Print — send a print job to the local print agent
- 🗑 Delete — to the trash
Crop
In the crop modal you drag the desired section with the mouse. Move it with cursor keys in 2-pixel steps, hold Shift for 20-pixel steps.
Aspect-ratio presets are built in: 1:1 (square), 2:3 (classic photo), 3:4 (portrait poster). With Reset you remove the crop and see the original render again.
Crops are non-destructive — they don't overwrite the original; they're applied dynamically on every download.
Text
Covered in detail in chapter 9.
Download & ZIP export
Single download via the ⬇ icon on the variant. The ZIP icon in the action bar at the top packs every selected variant into a single ZIP. Multi-select with shift-click or via the variant checkboxes.
If a logo overlay is active, variants and ZIPs can be downloaded either with logo or without logo. This keeps the same art variant usable for a branded customer file and a neutral export.
Filename schema:
OriginalName_StyleName.jpg
OriginalName1+OriginalName2_StyleName.jpg (multi-iris)The printer icon on a finished variant creates a print job. If the matching Windows print agent is running locally, it picks up the job, downloads the prepared JPEG and prints it in the configured format.
- Event variant: the job goes to the print agent of that event.
- Normal Studio variant: the job goes to the account print agent of your PurchaseID.
- Reprint: if the same variant was printed before, the button queues it again.
Printing uses the current variant including crop, text and active logo overlay.
Trash
Deleted variants land for 30 days in the trash (bottom-right tab Trash). Until then they can be restored or finally deleted. After that automatic cleanup.
Failed list
If a render fails, an own section Errors appears in the Variants tab with the API error. Retry kicks off a new render — usually enough if the API was briefly unavailable.
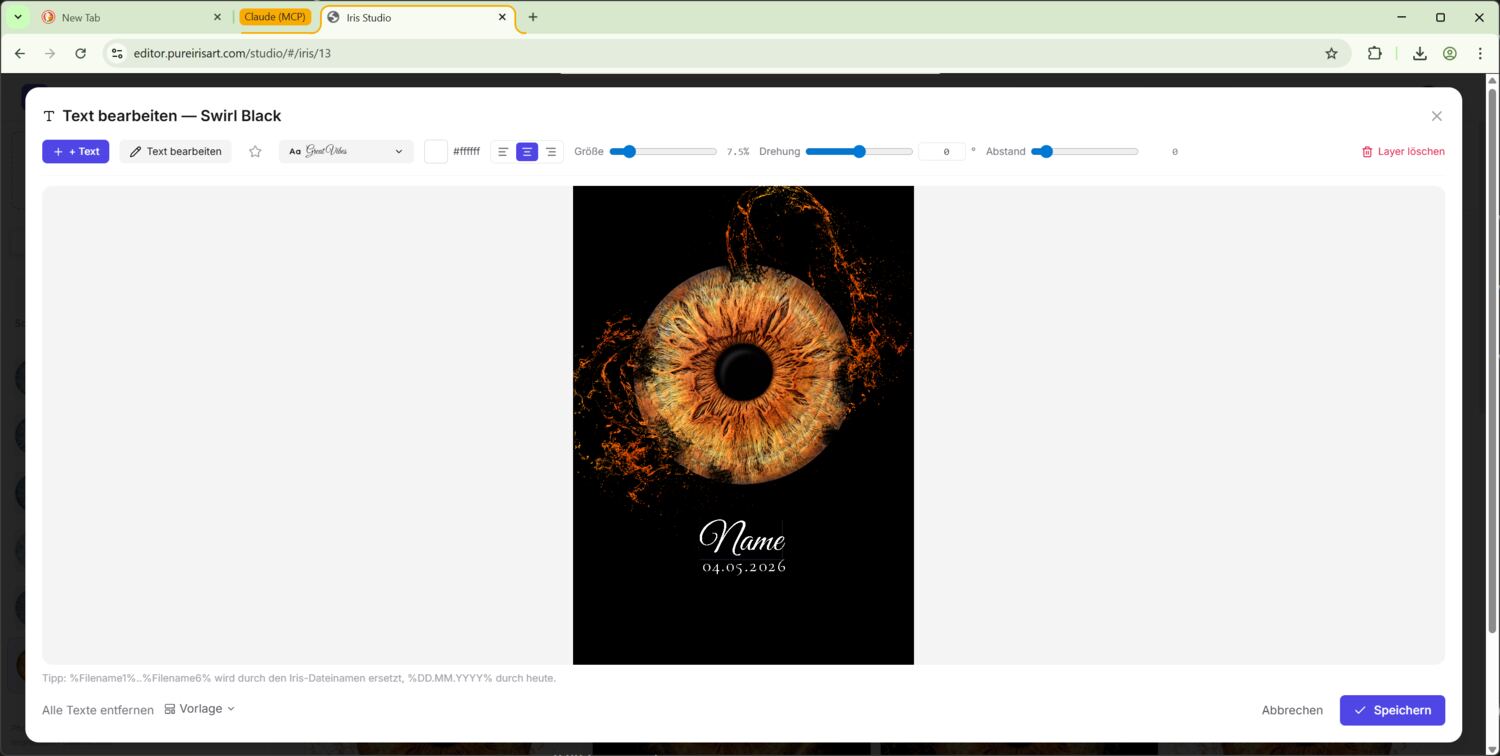
9. Text editor — put text on the artwork
Clicking the T icon on a variant opens the text editor. You can add multiple text layers, move/rotate/colour them — the preview is pixel-perfect what comes out of the download or print later.
Add a layer
Button + Text top left. The new layer drops top-left on the image and is immediately in edit mode — just type, the placeholder gets replaced. Esc or click outside ends editing.
Edit existing layers by double-clicking. Up to 20 layers per variant.
Fonts & favourites
47 curated Google Fonts in 5 categories:
- Script — handwriting fonts (Allura, Great Vibes, …)
- Display — eye-catching display faces
- Serif — classic serif faces
- Sans — modern sans-serif
- Mono — fixed-width typewriter style
In the font picker you can:
- Use cursor keys ↑/↓ to live-preview every font on the canvas (works even with the list closed)
- Filter by search or category
- Star the active font to add it to your favourites — they're stored in your account, available on all your devices
- The “Favourites” filter restricts the cursor-key navigation to your starred fonts only
Size, rotation, letter-spacing
- Size: slider 0.5 % – 40 % of image height. Double-click = reset
- Rotation: slider –180° to +180°, plus a number input for precise values. Double-click = 0°
- Spacing (letter-spacing / tracking): –50 to 500 in 1/1000 em. Negative = tighter, positive = looser
Anchor (left / centre / right)
The three icons in the toolbar decide which point a text aligns around when its length changes:
- Left — left edge stays fixed, text grows to the right
- Centre — centre stays fixed, text grows symmetrically
- Right — right edge stays fixed, text grows to the left
Important when you use variables: the anchor decides how different lengths line up. Classic example: %Filename1% may resolve to “Anna” or “Maximilian” — with anchor “Centre” the text stays centred for both.
Move + Shift axis-lock
Dragging with the mouse moves the layer freely. Hold Shift while dragging and the layer stays on a straight line — horizontal or vertical depending on which way you pull. Handy when aligning multiple layers on the same height.
Variables
You can type placeholders into the text content; they get replaced automatically:
| Placeholder | Replaced with |
|---|---|
| %Filename1% | Original filename of the iris in slot 1 (without extension) |
| %Filename2% .. %Filename6% | Same for slot 2 to 6 |
| %DD.MM.YYYY% | Today's date, format 03.05.2026 |
When you exit edit mode (Esc / click outside) the placeholder is immediately replaced with the real value — you see right away what will end up on the print. Re-editing the same layer brings the placeholder back, you can keep working with variables.
Templates
The footer of the text editor has a Template menu. It saves the current text setup so new variants of the same style start with that text already applied.
- Save as my template — applies only to your PurchaseID
- Remove my template — falls back to the default again
- Save as admin default admin only — applies to every customer that doesn't have their own template
Resolution order when a new variant is created:
- Customer override (your own template)
- Admin default
- No text
Save
Save → the browser renders the final text overlay as a transparent PNG at full image resolution and sends it along. The server composites it 1:1 onto the artwork — editor preview and download are pixel-perfect identical.
10. Settings
The user menu (top right) holds:
- Low-bandwidth mode — previews at 1200 px instead of full resolution. Off by default.
- Language — DE / EN / ES / FR. Effective immediately, applies across all your devices.
- AI extraction model — select GNB2, CIM2 or GNBP for new uploads.
- Edited iris output size — long edge from 512 to 8192 px, default 4096 px. Larger output takes longer to save.
- Logo on art styles — upload a logo, show or hide it, and set position plus maximum width.
- Account print operator only — choose print format, optional Windows printer name and download the preconfigured account print agent. This agent prints normal Studio variants that are not linked to an event.
- Events operator only — event management (see chapter 11)
- Logout
Logo on art styles
Logo on art styles defines an account logo that is placed onto finished art variants. The logo is applied as the final layer above crop and text.
- Upload — upload PNG, JPG or WebP.
- Show / hide — disables the logo for outputs without deleting the file.
- Top % / Left % — position of the logo centre relative to the art variant. Example:
95%top and50%left places the logo at the bottom centre. - Width % — maximum logo width relative to image width.
Changes also apply to existing variants because the logo is added dynamically during download, ZIP export, preview delivery and printing. Variant downloads still let you explicitly export with or without logo.
For the account print agent: download the ZIP, extract it and start start-print-agent.bat on the Windows machine. Empty printer name means Windows default printer.
11. Event mode Operator
Event mode is built for live events: you photograph irises on-site, the guest registers from their own phone, and ideally takes home a 15 × 20 cm print before they even leave the venue.
Requires your PurchaseID to be enabled as an event operator. Contact support if the Events entry doesn't appear in your menu.
The event card provides the registration URL, a downloadable QR code, a direct registration preview, the event print agent and guest management. Deactivating an event closes registration but does not delete the event or its guests.
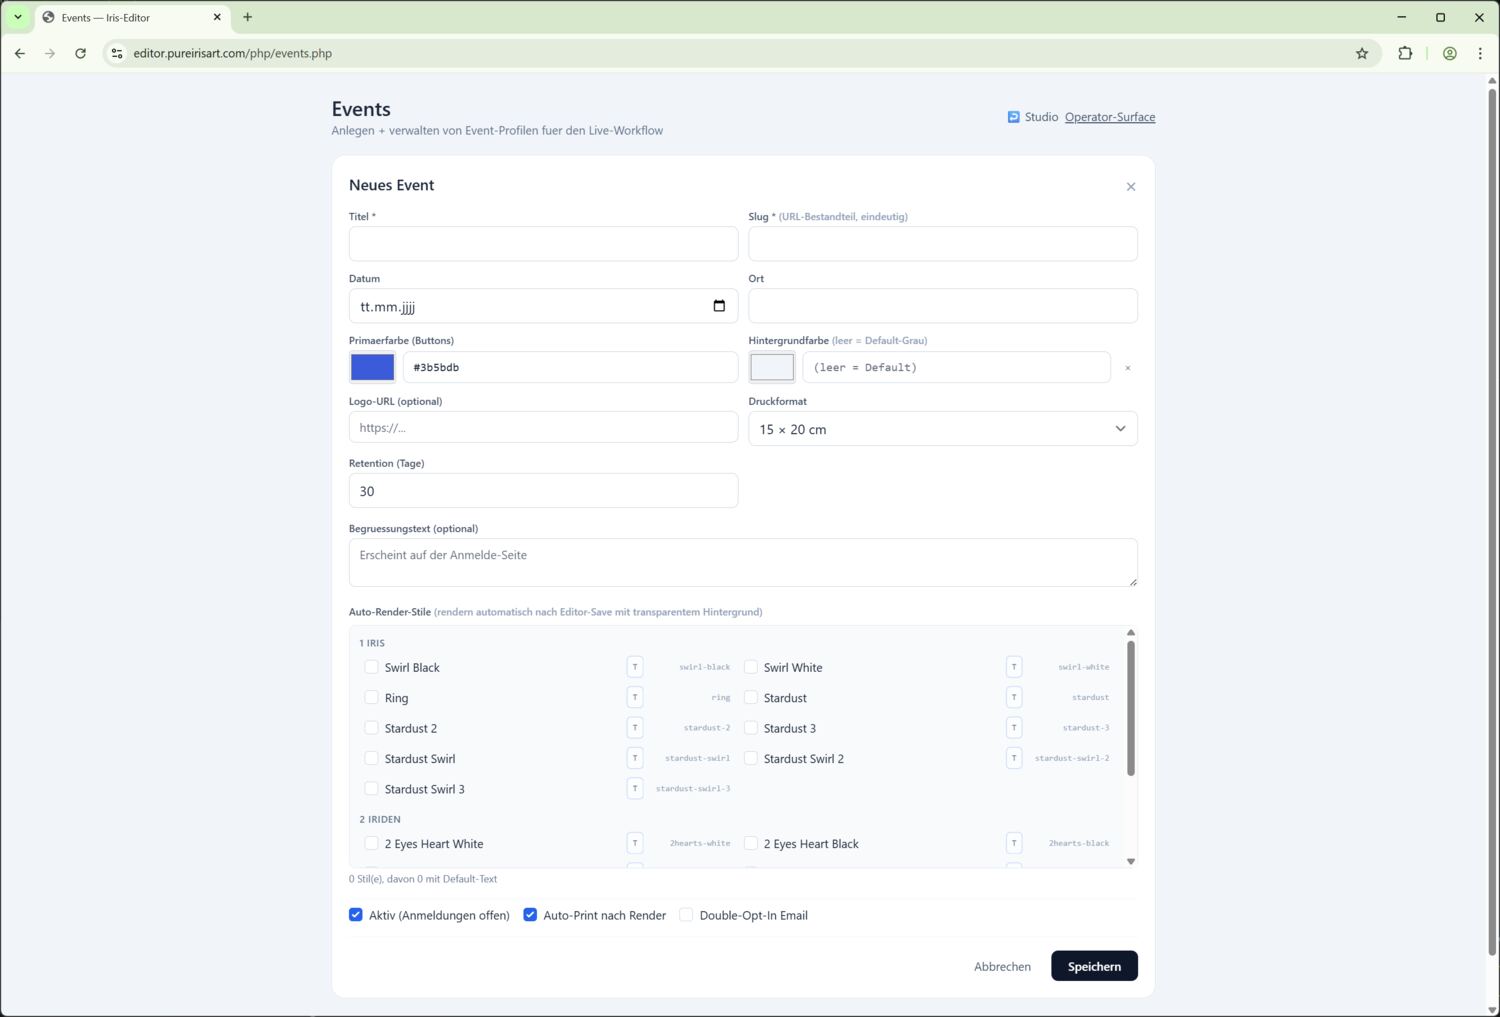
Create an event
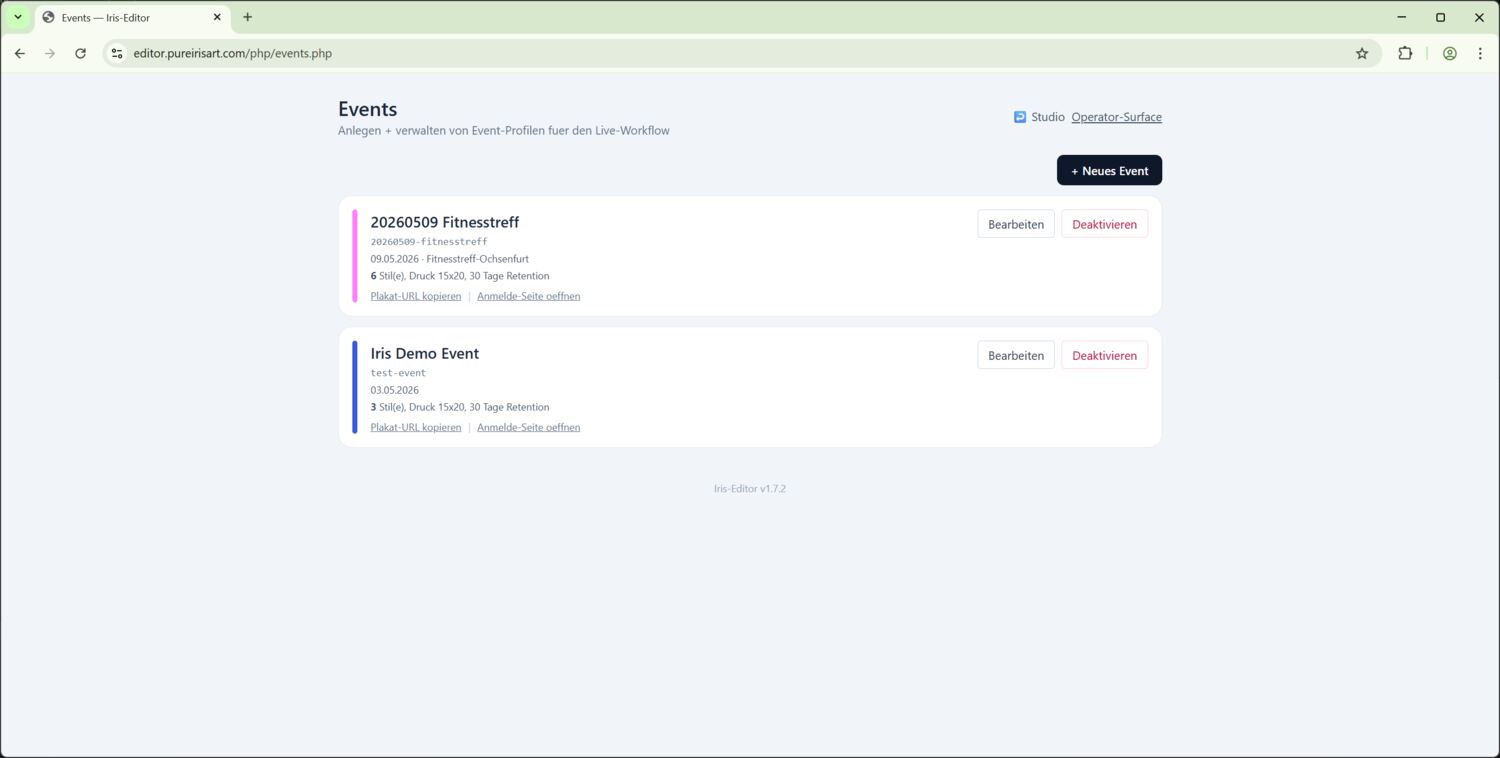
User menu → Events → + New event. Fields:
| Field | Meaning |
|---|---|
| Title | Display name, appears on the poster & phone page |
| Slug | URL component, unique (e.g. wedding-mueller-2026) |
| Date / location | Optional, display only |
| Primary colour | Accent colour for buttons on the public page |
| Background colour | Body background on register / status page |
| Logo URL | Optional, top of public pages |
| Print format / printer | 4×6 (1240 × 1844 px, about 10 × 15 cm) or 6×8 (1844 × 2436 px, about 15 × 20 cm); optional Windows printer name, blank = default printer |
| Retention (days) | How long data + renders are kept |
| Guest information | Optional registration-page copy for instructions or prices; supports bold, italic, lists and links |
| Auto-render styles | List of styles that render automatically after editor save |
| T-toggle per style | Per-style: render with default text or without |
| 🖨 / ☁ per style | Set per style individually: print on-site (🖨) and/or upload to gallery/email (☁). Replaces the former global auto-print switch — only styles marked 🖨 are printed. |
| Result delivery | Downloads or Pictrs gallery; optional custom result email with placeholders and a test-send function. FTP access can be tested as well. |
| Voucher (optional) | Toggle per event: code plus a percentage or euro discount in the email, valid until event date + 7 days. |
| Double opt-in | Optional: the guest confirms their email before QR/short code, upload and result delivery are released. Requires a mail config. |
| Active | Unlocks the registration page |
Poster / guest registration
After saving you'll see the event card in the events list. Clicking Copy poster URL gives you a URL like:
https://event.pureirisart.com/register.php?slug=<your-slug>Print this URL as a QR code and put it up at the event entrance. Each guest scans it with their own phone, lands on the registration page and types in:
- First name (mandatory)
- Last name (optional)
- Email (mandatory)
- GDPR checkbox (mandatory)
- Marketing checkbox (optional, for lead-gen)
After submit the guest's phone shows:
- A QR code (for your webcam to scan)
- A 6-digit code (fallback when the scan doesn't work)
Registration and status pages are available in German, English, Spanish and French. With double opt-in, QR and short code remain hidden until the guest clicks the confirmation link. The Guests view lets you correct names and email addresses or remove a registration; already uploaded photos remain in the Studio library.
Operator surface
On your photo laptop, open:
https://event.pureirisart.com/op.phpThe page has:
- A webcam area with an active QR scanner
- A manual code field + event dropdown (the fallback)
- A queue of every guest of every event of yours
- ? button at the top right — compact cheat sheet with every relevant URL
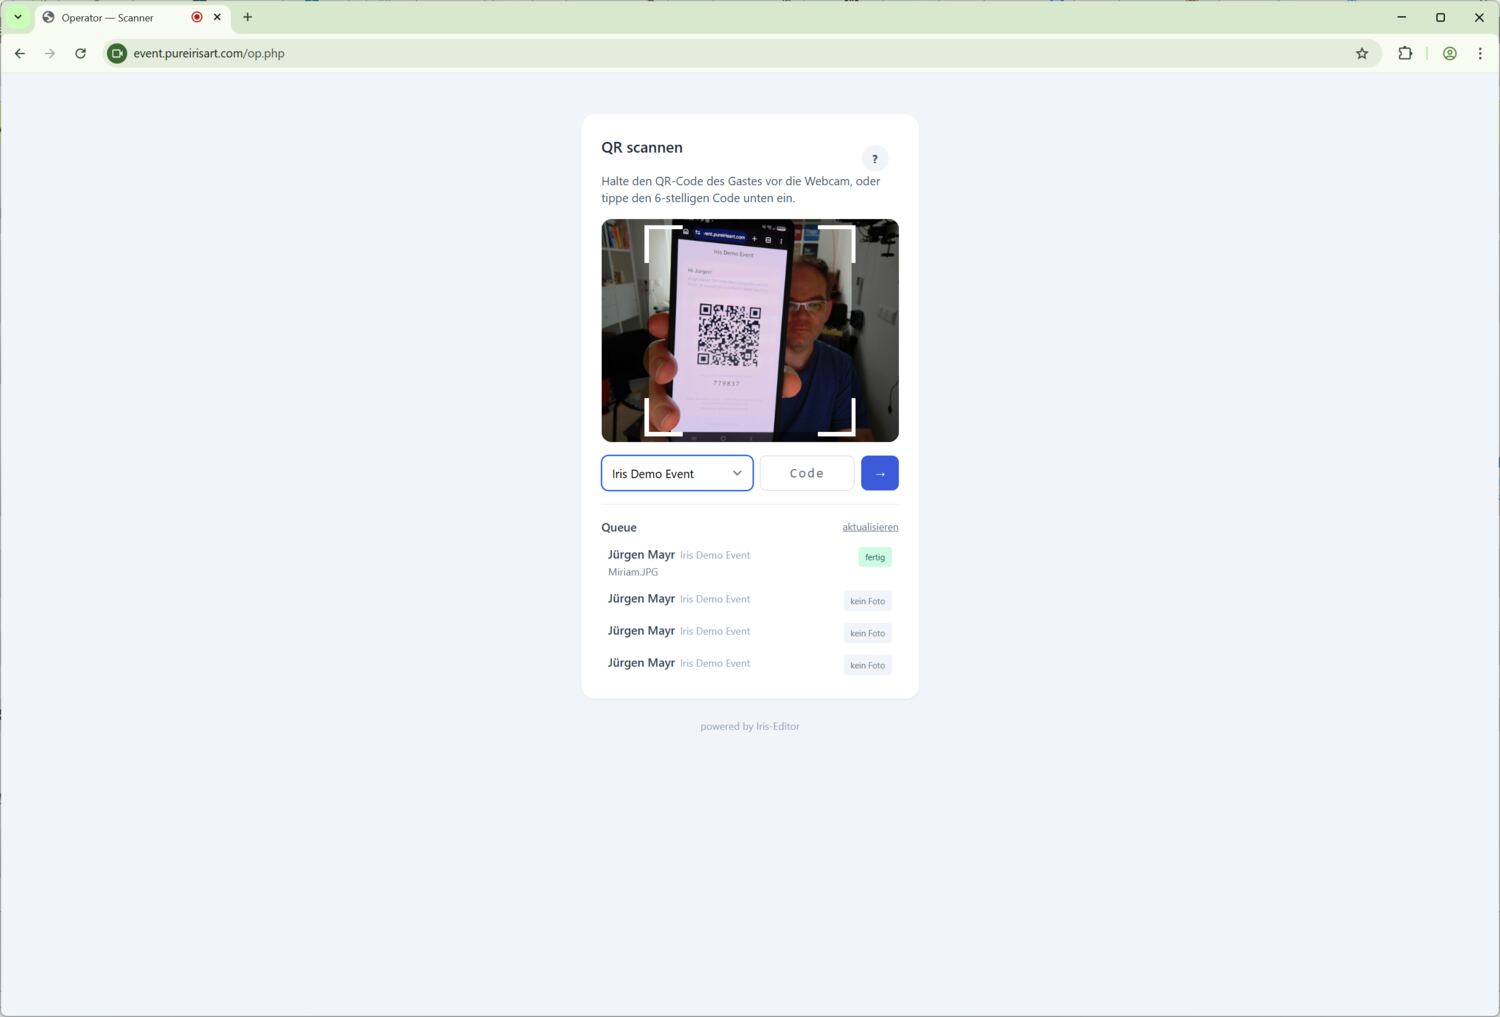
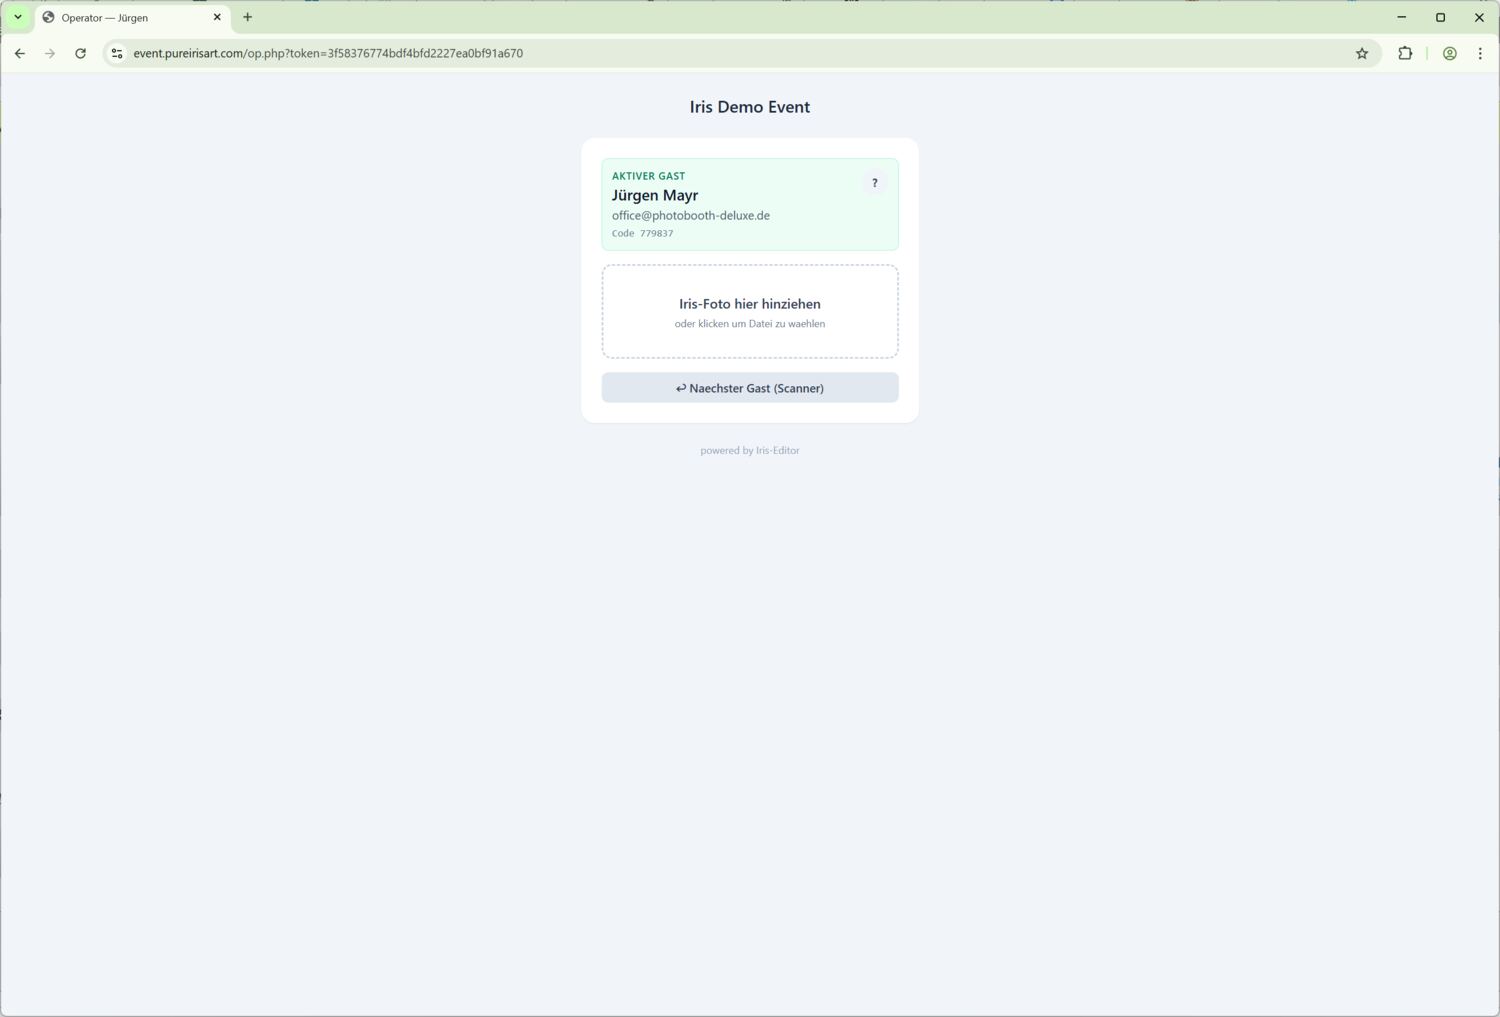
Workflow:
- Guest holds phone in front of the webcam → QR is scanned → drop zone opens with the guest's data
- Drag a photo from the tethering folder onto the drop zone
- Upload + iris extraction run — the guest sees the live status on their own phone and should keep the page open
- Operator switches to the next person, the editor calls
Auto-render after editor save
As soon as the operator saves an iris in the editor with Transparent background enabled:
- The editor closes quickly (UI feels snappy)
- Every auto-render style of the event is started in the background
- For each style with the T-flag, the default text with variables is applied automatically
- Renders show up in the operator queue with status rendering, then later done
- Once a render is done it is routed per style: 🖨 styles go to the print queue, ☁ styles to the gallery and/or result email.
Queue in detail
| Status | Meaning |
|---|---|
| no photo | Guest registered, no photo uploaded yet |
| extracting | Photo uploaded, AI extraction in flight |
| edit | Extraction done, waiting for a manual editor save. Click Editor to open the iris in the studio in a new tab. |
| rendering | Editor saved, auto-render in flight |
| done | All renders finished |
| error | Tidy with the ✕, save in the editor again to re-render |
Each row shows guest, event, file and status. Depending on state, ↻ retries extraction, ✕ clears failed or stuck renders, and the mail buttons trigger or repeat delivery. Retrying delivery also catches up an unsuccessful Pictrs push. The queue refreshes every 15 seconds and can be refreshed manually.
Event print agent
In the event list you can download a preconfigured Windows print agent for each event. The ZIP already contains the poll URL and access token for exactly that event, so multiple parallel events do not mix their print jobs.
Extract the ZIP on the Windows print computer and start start-print-agent.bat. It uses the printer stored in the event or the Windows default printer when that field is blank. Download a fresh ZIP after changing the agent settings.
Print jobs are created automatically once art variants finish — but only for styles marked 🖨 in the event (the per-style routing replaces the former global auto-print switch). If no style is marked 🖨, nothing is printed. You can also send finished event variants to the queue manually at any time via the printer icon in the Variants tab — this works regardless of the routing.
Result delivery to the guest
Styles marked ☁ are delivered digitally. You decide how, per event:
- Downloads — the guest gets download links to their ☁ variants.
- Pictrs gallery — the ☁ variants are sent by FTP to a personal hidden, code-protected sub-gallery. A
.readyfile triggers immediate import; no manual FTP import is required. Optionally, white- and black-background JPGs of the edited iris are included.
Test FTP before the event and set the intended event price list as the Pictrs shop default. Alternatively, gallery mode can use a fixed gallery URL without auto-push.
Optionally, once all renders are finished the system automatically sends a result email to the guest — in their language, with the download links or the gallery link. You can customise and test the email per event. Pure 🖨 styles without ☁ trigger no email.
You can also enable a voucher per event: a free-form code with a percentage or euro discount appears via the {coupon_block} placeholder and is valid until the event date + 7 days.
12. Troubleshooting
Login doesn't work — “PurchaseID invalid”
Double-check the PurchaseID: no spaces, uppercase. If it's right, the validation API may be briefly down — wait a minute, try again. After repeated failed attempts the IP gets locked for 15 min (brute-force protection).
Iris extraction stuck at 50 %
The AI API has hung. Click the retry icon on the library card — extraction restarts without re-uploading the photo.
Multi-iris style fails with “iris has no transparent background”
The selected slot contains an iris without transparent background. Open the iris in the editor, switch on “Transparent background”, save. Then apply the style again.
Text position in editor ≠ position in download
Shouldn't happen since version 0.17.0 — the browser renders the text overlay as a PNG, the server composites 1:1. If you still see an old cache: touch the variant once via crop or re-save so the caches refresh.
Script-font swashes are clipped in the editor
Fixed since 1.0.x — Fabric glyph caching disabled. If you still see it: browser reload, possibly clear browser cache.
Render hangs in “rendering” and never finishes operator
Click the ✕ on the right of the queue row — every stuck render of that iris gets deleted. Save the iris in the editor again, the auto-trigger picks fresh render jobs.
QR code guest → operator doesn't work operator
Three standard causes:
- Webcam permission not granted in the browser → check the address bar, allow again
- Reflection / poor lighting → type the 6-digit code manually (pick the event from the dropdown)
- Session cookie still on the old subdomain — log out completely + clear cookies, log in again
Move data between PurchaseIDs (e.g. after accidentally logging in with the wrong one)
Use the CLI script scripts/transfer_purchase.php. See scripts/README.md in the repo. Always run with --dry-run first to inspect the plan, then again without.
13. Glossary
- PurchaseID
- Permanent string identifier issued at purchase. The only login mechanism.
- Upload
- The original photo in your library. Each upload spawns iris versions (extracted, edited).
- Iris version
- A processed form of your iris: extracted (AI output) or edited (after your slider tweaks).
- Artwork / variant
- The finished image made of iris(es) + style. Any number of styles per iris combination, one variant per style.
- Style
- The AI art template (e.g. Stardust, Swirl Black). Each style fixes the required iris count.
- Crop box
- Per-variant cropping definition. Non-destructive — applied dynamically on every download.
- Text overlay
- The text layers on a variant. The browser renders the overlay as PNG, the server composites it onto the artwork.
- Logo overlay
- Account logo that can be placed as the final layer on art variants. Position and width are set in the user menu.
- Text template
- Pre-defined text-layer setup per style. Auto-applied to new variants when enabled.
- Event operator
- Configuration container for a live event with its own branding, default styles and guest registration.
- Operator surface operator
- The live operator UI at
event.pureirisart.com/op.php— webcam scanner + drop zone + queue. - Low-bandwidth mode
- Previews load at 1200 px instead of full resolution — saves bandwidth. Toggle in the user menu.